Create a Basic Trainer Battle

Setting up a trainer in Pokémon Studio
First you will need to open Pokémon Studio, go to the trainers tabs, and click on the "+ New trainer" button in the top left. Now let's begin!
- Fill in the name, of the trainer. This is displayed when it says you are challenged by the trainer, when they send out their Pokémon and any other reference used in battle.
- Fill in the trainer class. This is also displayed when it says you are challenged by the trainer and when you lose/defeat them.
- Select the AI level, this is how difficult the AI will be. There are 7 levels. I will go over these down below.
- If you want a double battle, change the battle type from "simple" to "double."
- Leave scenarized battle at 0 for now, this is for more advanced trainers.
- Select the trainer sprite. (PSDK will provide the user with some XY styled graphics, but mostly gen-4 DP styled graphics. These are found in your graphics/battlers folder)
- NOTE: If you are only using the gen 4 sprites, change variable 31 to 2. If using XY styled ones, leave it at 0.
- Select the base money, under that will display the actual amount earned.
You should now have something similar to this:


Now hit "Add the trainer" and let's move on to the next step!
NOTE: If you want to change anything about the trainer's info that we just set later on, you can. Once you've added a trainer you'll just click on the top section that has the trainer's class and name in it.
Quickly going over AI levels
- Level 1 - Can see base power of their moves and decide off that (typically ~youngster level)
- Level 2 - Same as above, can see type effectiveness (tyically ~bird keeper level)
- Level 3 - Same as above, can see the kind of move (the category) (typically ~sailor level)
- Level 4 - Same as above, can mega evolve, switch pokemon, and use items except healing items (typically ~gambler level)
- Level 5 - Same as above, can choose their target (typically ~"Boss" level)
- Level 6 - Same as above, can use healing items (tyically ~rival, gym leader, e4 level)
- Level 7 - Same as above, can read the opponent's (user's) movepool (typically ~champion level)
Assigning the trainer's data

So now you should be looking at a screen similar to this. If you are wondering how I have both the XY styled and gen-4 styled sprite, select the XY styled sprite for the "Trainer sprite" and have a trainer's a sprite in your "battlers" folder with the same name! Like shown below.
NOTE: It still will only use one of these graphics for the battle transition, based on whatever your variable 31 is set to.

- To set the trainer's dialog you just click on on the tab titled "Dialogs" and edit the victory and defeat message. The "Trainer's victory" message is shown when the trainer wins. The "Trainer's defeat" message is shown when the trainer loses.
- To set the trainer's party you can either import an already existing trainer's team, or add new Pokémon one-by-one.
- To add a new Pokémon, click the "Add a Pokémon" button, type in the Pokémon's name, and click "Add the Pokémon."
- By default, the Pokémon will have a random available ability, the last 4 moves it could learn in it's level up learn pool, a random nature, no EVs or IVs, and no nickname. These can all be changed by clicking on the specific Pokémon in the party tab.
- If you want the trainer to have any items, add them into their bag. NOTE: Only AI >= level 4 can use items!
Hit the save button in the bottom left corner of Studio, and then let's open our project in RPG Maker XP.
Setting up a trainer in RPG Maker
There's a few ways to set up a trainer, but we are going to go over two. The first method we will go over will be the old-fashioned "push-a-few-buttons-and-I'm-done" method (which just uses RPG Maker's event buttons), the second method will just be setting the trainer up via a script command.
NOTE: For all three methods you will need to know the Trainer's ID, this is found in Studio here! This is a value you will need to remember.

Optional: Trainer Spotting (Will always be the first page if using it)
This is ONLY necessary if you want the event to activate from a few feet away. It takes advantage of a function called "trainer_spotted(x)" which makes the event register if the trainer walks past their line of sight by a specifed amount of tiles! It's not a requirement for trainers, but if you do want to use it, you will need to do it on the first page.
Make the first page's trigger a parallel process with just this in the event command (you can change the 7):
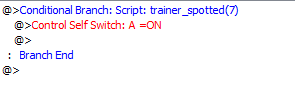
Make sure page 2 has "Self Switch A" as active (or whatever one you turned on) and set its trigger to "autorun." If you want the trainer to walk up to the player, open "extendtext.exe" in your project's root folder, and at the start of page 2 put one of these as a script before calling the battle:
#This will make the trainer walk up to you and say hello
trainer_eye_sequence('Hello!')

#This will make the trainer walk up to you, say hello, and change the BGM for as they walk up
trainer_eye_sequence('Hello!', eye_bgm: 'audio/bgm/pkmrs-enc7')
METHOD ONE: RPG Maker's Event Buttons
This is the most bare-bones, fool-proof, way, but also the most limited way. I'd advise this for most trainers.
- Open an event in RPG Maker and hit "Control Variables..." on page 1 of the "Event Commands" and select Variable 8.
- Set Variable 8 equal to the Trainer ID!
- OPTIONAL: Select the battle background by going to page 2, "Change Map Settings", and setting the "Battleback Graphic."
- OPTIONAL: Select the battle BGM by going to page 1 and selecting change "Battle BGM" and selecting it.
- Then go to page 3 and hit "Battle Processing..."
- Select troop 3
- OPTIONAL: If you want, set the player to have the ability to escape
- OPTIONAL: If you want, set it to where the game continues when you lose
- Set what you want to happen when the player wins
- OPTIONAL: If you set it to continue when you lose, you can change what happens when the player loses!


Congrats, with all that done you should have something similar to this:

METHOD TWO: A script command
This method is essentially the same as method one. It's bare-bones, fool-proof, but also fairly limited. I'd advise this if you prefer using scripts over GUI.
- OPTIONAL: Select the battle background by going to page 2, "Change Map Settings", and setting the "Battleback Graphic."
- Open an event in RPG Maker and hit "Script..." on page 3 of the "Event Commands"
- Put this in your script and change the value to your trainer's ID
# Change 286 to your trainer ID
start_trainer_battle(286)

# All the optional things that MUST be done after start_trainer_battle but in the same script command:
$game_temp.battle_can_lose = true
NOTE: You can also change the BGM, or even set up double battles and double battles with an ally this way!
# To set a specific BGM
start_trainer_battle(286, bgm: 'pkmrb-battle3')

# To set up a double battle change 287 and 287 to the two trainers ID's
start_double_trainer_battle(286, 287)

# To set up a double battle w/ ally change 287 and 287 to the enemy trainers ID's and 289 to the ally ID
start_double_trainer_battle_with_friend(286, 287, 289)- If you set it to where the player can lose, set a conditional branch on switch 37 checking if it's ON. If it's on, you won your last battle! If it's off, you lost and can set it to do something different.
Congrats, with that done you should have something like this:

Final example using Trainer Spotter & Script Commands:


Final example using Trainer Spotter & Button Commands
